How to update macos Catalina 10.15 to Big Sur macos 11.0. after downloading Big Sur macos 11.0 profile when I got and check in updates tab I got an update of macos 10.16, not Macos 11.0 so how to skip this version and directly install Big Sur 11.0 beta withhout install Macos catalina 10.16.Follow below to know how to update Catalana 10.15 beta to Big Sur 11.0 directly skipping all version.
Can your Mac run macOS 11 Big Sur?
Before you begin to download the macOS 11 Big Sur Developer Preview, you should make sure your Mac can run the software.
These are the Macs that you can install macOS 11 Big Sur on:
12-inch MacBook (2015 and later)
MacBook Air (2013 and later)
MacBook Pro (Late 2013 and later)
Mac mini (2014 and later)
iMac (2014 and later)
iMac Pro (all models)
Mac Pro (2013 and later)
Make sure You mac is listed above supported macbook and air for Big Sur 11 OS.
How to update macos Catalina 10.15 to Big Sur macos 11.0
Click it, and the file will download. Now, open up the Downloads folder in Finder and select ‘macOS Big Sur Developer Beta Access Utility’. Next, double-click the macOSDeveloperBetaAccessUtility.pkg file to begin installing.
During this process, System Preferences will open and check for macOS updates. When it find the update for the developer preview, click ‘Update’. If it doesn’t find the update, restart your Mac, open the Mac App Store and click ‘Updates’.
You will see Macos Beta 10.16 9.56GB this is actually Macos Bigsur 11 not Catalina 10.16 😂 So go ahead and download it.
Once macOS 11 Big Sur Developer Preview has been downloaded in its entirety, a new window will open prompting you to agree to Apple’s terms and conditions. From there, follow the instructions to install the new operating system.
At the Special Event keynote of the Worldwide Developer Conference 2020, the Apple CTO presented the new name of macOS which succeeds the very controversial Catalina edition: it is Big Sur, a title predicted a few hours earlier and referring to the sunny beaches of this Californian coastline located not far from the Apple Park. This year, the most remarkable is probably on the design side, with significant improvements that quickly overshadow the departure of Jony Ive .
You may be wondering what more does the macOS 11 Big Sur have to offer you? Well find out for yourself, you even can in Windows, first you’ll need to learn how to install macOS 11 Big Sur on VirtualBox on Windows PC. And don’t worry we will instruct you how to.
Download Big Sur InstallAssistant.pkg (9GB) either inside the virtual machine or on the host on a disk image that will be mounted on the virtual machine. Windows can create and mount VHD disk images through Disk Management.
Use VirtualBox to create an additional disk image that’s has at least 60GB of space. Attach it to the virtual machine and erase it with Disk Utility, formatting it to APFS.
Run InstallAssistant.pkg which creates an “Install macOS Beta.app” in the /Applications folder
Run “Install macOS Beta.app”, select “Show All Disks…” and select the new empty disk.
Allow the installer to complete. When the macOS initial setup starts, shut down macOS with Command-Q
Set the virtual machine’s USB version to 1.1 and disable all network adapters from the VirtualBox settings (AppleKeyStore, the system’s secure keychain, crashes otherwise)
Boot macOS Big Sur and complete the initial setup
After initial setup is complete the USB settings and network adapters can be restored.
Congrats, you have a macOS version that’s slower and uglier than Catalina! Hopefully Apple will replace the blurrier icons and other blurrier graphical interface elements by release time.
Method 2
VirtualBox and a VirtualBox Extension Pack?
VirtualBox is a virtualization program and essentially its purpose is to create virtual machines that can run on Linux, macOS or Windows operating systems on a desktop that is already under the control of another operating system. Using this software you can create a virtual machine, manage and access it with ultimate ease.
Also using VirtualBox, you can also integrate both your Windows 10 and macOS Big Sur virtual machines allowing you to share files. There are also an abundance of many other interesting features included in VirtualBox and Mac OS can also affect the performance of your base Windows Operating system.
This new system USB wise will only support USB 3.0. If you install the VirtualBox Extension Pack this can help you in fixing the problem as it has the capability to connect to the VirtualBox which unlike the macOS system can cater for USB 3.0 devices also.
Download macOS 11 Big Sur ISO Image
If you want to run macOS 11 Big Sur using your VirtualBox virtual machine first and foremost you’re going to need a macOS Big Sur image (ISO file). On here are the installation files that you need to install macOS versions 11 These images are available online however not all of them guaranteed to work with VirtualBox. In order to help you create a macOS ISO image below. This has been made from scratch, and will help you set up macOS Big Sur 11 on your Virtual Machine in just a few minutes.
How to install macOS 11 Big Sur on VirtualBox on Windows PC
Step 1: Download Big Sur Final from the Mac App Store
The first step towards creating a macOS Big Sur ISO file is to download macOS Big Sur Final from the Mac App Store.
This is not possible if you can’t access a Mac. If you do not have one, consider borrowing it from your friends or use a Virtual Machine. You will need it for about 15 minutes. The consecutive steps can be completed on your Windows PC. The installer will launch once the process is complete. You only need the downloaded files. If you want to access the Installer File, you can find it in the Application folder.
Sep 2: Create macOS Big Sur ISO File
Find your macOS Big Sur.App and move it to the Application folder. You must use the Terminal to convert the files to an ISO. You can find the Terminal in Applications > Utilities.
Step 3: Install New VirtualBox 6.1.4 and then install the Extension Pack.
Now that we have unzipped the folder and we now have access to the image, we need to then install VirtualBox and also at the same time make sure that it is the latest version. You’re going to want to go ahead and download, and install VirtualBox.
If you remember we mentioned the VirtualBox Extension Pack, well you can download that here. Then open the application and click to install the extension pack on your VirtualBox.
Step 4: Create a New Virtual Machine
Now that you have successfully downloaded VirtualBox and we also have the ISO image ready, we are going to want to create what is called a new Virtual Machine. The first step of this is to go to the top of your VirtualBox window and click “New ” button. What happens next is that a wizard will appear that will walk you through the steps of creating a Virtual Machine.
As the wizard guides you through the process of creating a virtual machine you are going to be asked various bits of information:
Name for Virtual Machine: macOS big Sur 11. Type: Mac OS X. Version: 11. RAM: We usually recommend this be around 50% of your physical RAM availability, so if your computer has 8GB RAM go ahead and select 4GB.
Once you have named your virtual machine and decided upon the RAM Usage it is next going to ask you what Hard Disk you want the Virtual Machine to use. You will see three options, do not add, create or use an existing one. Select “Create a Virtual Hard Disk” with 100GB and browse to where the “macOS 11 Big Sur..vmdk” file was located and then finally click create!
Step 5: Edit the Virtual Machine
We have now finally created the Virtual Machine, however that isn’t everything finished, we need to alter a few settings. And to do this, go into settings. From the list on the left select ‘System‘. There will be three tabs at the top, select ‘Motherboard‘ and tick the box which says ‘Enable EFI‘ and for Chipset from the drop down list select PIIX3.
Change VirtualBox Chipset to PIIX3
Then in the Processor tab tick the box next to ‘Enable PAE/NX’ and increase the amount of core to 2 (presuming that is 50% of your CPU).Processor Tab
Next up in the settings select ‘Display‘ from the list on the left. The first tab you should see should say ‘Screen’. Here you can decide upon the Video Memory of your Virtual Machine, its ideal to set it at 128 MB and Graphics Controller is VMSVGA.Set up Video Memory with 128 MB
The final part of the settings process is to select USB from the lsit on the left and go ahead and tick the box that says USB 3.0 as if you remember it only supports USB 3.0 natively and not 2.0Enable USB 3.0 in VirtualBox
Step 6: Add ISO Image
Open Storage tab, Click on CD/DVD icon and open your “Big Sur..iso” image.Add Big Sur. ISO image to VirtualBox
Step 7: Use Command Prompt to add the following code to VirtualBox
Close VirtualBox before follow this step, we are going to give you some code to add in to VirtualBox however you’re going to need to do this through CMD or Command Prompt. Go to your start menu and type in CMD and you should see the below, if you do, go ahead and right click and click ‘Run As Administrator’.Open Command Prompt (cmd)
VBoxManage setextradata “Your VM Name” “VBoxInternal/Devices/efi/0/Config/DmiSystemProduct” “iMac11,3”
VBoxManage setextradata “Your VM Name” “VBoxInternal/Devices/efi/0/Config/DmiSystemVersion” “1.0”
VBoxManage setextradata “Your VM Name” “VBoxInternal/Devices/efi/0/Config/DmiBoardProduct” “Iloveapple”
VBoxManage setextradata “Your VM Name” “VBoxInternal/Devices/smc/0/Config/DeviceKey” “ourhardworkbythesewordsguardedpleasedontsteal(c)AppleComputerInc”
VBoxManage setextradata “Your VM Name” “VBoxInternal/Devices/smc/0/Config/GetKeyFromRealSMC” 1
Add Commands to CMD
Step 8: Install macOS Big Sur. in VirtualBox
Reopen your VirtualBox and click “Start” in the left-hand corner. This will turn on your Virtual Machine. Once you have seen the macOS Utilities, open “Disk Utility“.Open Disk Utility in macOS Big Sur.
Select VBOX Virtual Disk and format it as “Mac OS Extended (HFS)”Format VBOX Hard Disk
Now, Install macOS Big Sur. on your VirtualBox Disk.Install macOS Big Sur. on Virtual Disk
Once it has rebooted up. Turn off your Virtual Machine. Open VirtualBox, then remove “Big Sur..iso” in Storage tab.Remove Big Sur. ISO image in VirtualBox
Once you have seen that the macOS Big Sur. installation has completed, turn off your VirtualBox.The completion of the installation
Step 9: Run macOS Big Sur. VirtualBox
If you have followed all of these steps correctly which hopefully you have you can now open your Virtual Machine and start running Mac OS. As you would have to on a normal Mac you’ll have to go through the initial set up and set yourself up an account however once this is done you can then use your Mac OS Virtual Machine to its full potential.Create a New Account in macOS 11
Now have you followed all of these steps you should now be able to start using macOS Big Sur. for whatever purposes you may need it for. Hopefully this guide has made the process of running macOS Big Sur 11 on your VirtualBox easier than ever.macOS Big Sur. VirtualBox
Bottom Line
Now have you followed all of these steps you should now be able to start using macOS 11 for whatever purposes you may need it for. Hopefully this guide has made the process of running macOS Big Sur. on your VirtualBox easier than ever. This now means that you’ll never need to settle for running a single OS again, you can run macOS alongside your Windows Operating system with ease.
Install a new VirtualBox 6.1.4 to fix problem with macOS 11.
Is your mac running out of space running mac os Big sur? How to Free Up Space on macOS Big Sur ? At the Special Event keynote of the Worldwide Developer Conference 2020, the Apple CTO presented the new name of macOS which succeeds the very controversial Catalina edition: it is Big Sur, a title predicted a few hours earlier and referring to the sunny beaches of this Californian coastline located not far from the Apple Park. This year, the most remarkable is probably on the design side, with significant improvements that quickly overshadow the departure of Jony Ive .
1. Remove App Junk
App junk are those programs that tend to remain hidden on your macOS even after dropping them on Trash. However, it is worth understanding that deleting unwanted app manually increases your chances of completely removing some critical programs. Therefore, carefully check the filename before deleting it to ensure that it’s for the intended app.
If you want to ensure that you delete all the program junk from your macOS Big Sur, follow the following steps:
Step 1. Take note of the apps you’ve sent to Trash and jot them down. Afterward, find the app junk and the files they are related to.
Step 2. Visit the app location to find the associated programs. Open Finder, Select “Go” and choose “Go to Folder”. Type “/Library/Application Support” and click “Go”.Go to the folder in macOS Big Sur
Go to the folder in macOS big sur
If you want to locate a particular program for a specific app, follow the following commands:
Library apps – /Library/Application Support/
File Support Cache – /Library/Caches/
Launch Agents – /Library/Launch Agents/
Preference Files – /Library/Preferences/
Application Support Files – /Library/ Application/
Binary and Dock Items – /Application/
Start-Up Items – /Library/Startup Items/
Saved App States – ~/Library/Saved Application State/
2. Clean Your Download Folder
Are you still puzzled on how to get rid of all those PDF files you obtained from the internet or the images you opened after reception from friends or relative? All these files end up in the Downloads folder on your macOS. Without wiping them off, they end up taking up a considerable chunk of your hard drive space. To get rid of file junk from your downloads,
follow the following steps: Clean Download Folder
Visit the Downloads folder near the Trash Can icon to reveal downloaded items.
Click the “Open In Finder” button to find the “Downloads” folder, which contains all your downloads.
Once here, you can either press Command + A to select all files or choose each file one at a time.
Once you’re done highlighting the intended files for deletion, drag and drop them in the Trash Can.
3. Use Storage Optimization Tool on macOS Big Sur
The new macOS Big Sur has a new storage optimization tool that ensures the device has an optimized storage usage at all times by avoiding space wastage. Also referred to as the “Storage Tool”, this feature offers additional space in your hard drive for you to store other programs and files.
To activate the storage optimization tool in your macOS Big Sur, follow the following procedure: Visit the “Apple Menu” located on the top-left of your screen. Click on About This Mac > Storage > ManageUse New Storage Optimization Tool on macOS Big Sur
You’ll see a pop-up message with several options. Click on the “Optimize Storage” button. Once activated, the optimizer will automatically arrange your files, removing any program junk to free up space. The reason why the storage optimization feature excels in the macOS Big Sur is that the device has an enhanced space for additional storage.
4. Clean Cache on your Mac
In simple terms, a cache is a type of temporary files that enable the macOS Big Sur to operate efficiently. There are various types of cache files. They include Browser cache, System cache; and User cache. Although these caches are helpful, they are temporary and can usurp a large space on your macOS disk.
Clearing Browser Cache on Your macOS If you are a heavy internet user, you may end up clearing megabytes of cache files on your macOS Big Sur. The official MacBook browser is Safari, and you can remove the cache by following the following steps:Show Develop Menu in Safari
Click the Safari icon to open the browser.
Go to the menu and click on “Preferences”.
Go to the “Advanced” feature and tick the “Show Develop” in the menu bar.
Click the “Develop” button in the menu bar and choose the “Empty Caches.”
Close the Safari browser for cache clearance to be complete.
Clear System Cache and User Cache
The system and user caches are the temporary files that let you use your macOS on daily operations. For example, when you listen to music or view a video on your MacBook, the information is stored in the system cache file. The device can, therefore, locate the file quicker and easier on a subsequent command. With time, these caches can occupy a large space on your macOS Big Sur. If you’d like to clear all cache from your macOS or delete a cache belonging to a particular application, here’s the procedure
Go to Caches Folder
Terminate the operations of all applications.Launch “Finder”. Select “Go” on the Finder menu and choose “Go to Folder”. Type ~/Library/Caches/ and click “Go”. Find the cache file related to a specific app and choose the items you need deleted and drag them to the Trash Can.
5. Use Cloud Drives
Is your MacBook filled up because of storing a lot of programs and apps? Additionally, you may lose your personal data by frequent misplacement of your USB flash drive. That’s why software developers have created cloud-based storage apps to help you to free up space on your macOS. There are several cloud drives you may consider, but each operates differently with different operating systems. Below are some of the best cloud drives for you macOS Big Sur.
Google Drive. Albeit Google Drive was initially intended for storage purposes, it expanded its featured tools by incorporating an office suite that comprises Google Docs too. Fr merely having a Google Drive, users get 15GB free storage space. However, for additional space, you’ll have to incur monthly subscription fees.
iCloud Drive. This Apple cloud-based storage software works best with Apple’s latest gear on the macOS Big Sur. When you use it on any macOS device or an iDevice, you get an extra 5GB of free space. It comes with an integrated office suite, although it only contains basic features like Pages, Keynote, and Numbers. iCloud supports Windows but is still not supportive of Android.
Dropbox. Dropbox free storage is 2GB. The advantage of this cloud storage app is that it’s compatible with different platforms, including Windows, Mac, Linux, iOS, Kindle, Android, and Fire mobile application programs. Dropbox also provides different promotional offerings such as an extra 250MB for just getting started with the tutorial or 3GB extra space for uploading images through the mobile app.
6. Find and Remove Duplicate Files
The daily utility of your macOS may mean having duplicate files. The most common reason why you may have duplicate files is because of program installations. When an essential program feels under threat from other applications, it may duplicate itself to minimize the risk of malfunctioning.Find and Remove Duplicate Files
But if you find an unimportant program with it duplicate, you can install the Gemini 2 App for macOS. Gemini helps you identify, locate, and get rid of duplicate content in whichever corner they lay concealed. Regardless of the capacity of your hard Drive, Gemini can scan it at a lightning-fast speed. Furthermore, the software also locates and removes similar files to ensure you have free space on your MacBook.
7. Use Third-Party Apps
Instead of using the manual method of clearing space, you can use automated software that performs all that work in a fraction of the time. The Clean My Mac app automatically rids your macOS system of junk file and other remnant programs that eat up space in the device. By using the Clean My Mac software, you can clear up space to revamp the speed and operations of your MacBook.
If you are facing issue in bluetooth connectivity in Macos Big Sur os then you can follow below steps to troubleshoot is easily.
Some people have been experiencing a problem where Bluetooth devices are having issues with Mac running macOS Big Sur. Some problems that are reported by the user is. Bluetooth not connecting at all or Bluetooth disconnecting every now and then or the voice quality is very mad over Bluetooth in Bluetooth speakers connected to macbook pro or air.
Fix 1:How to fix the Bluetooth issue in macos Big Sur.
To fix bluetooth issue in Big Sur follow below steps
Firstly opening up Finder and then click on ‘Go’ in the top menu, t
Then ‘Go to Folder…’.
And type in ‘/Library/Preferences’.
Once you go inside the folder you will see a file called ‘com.apple.Bluetooth.plist’ Just delete this file of you can take the backup of this file before deleting it.
Once it is deleted you have you restart your Mac running Catalina os.
After restarting try connecting your Bluetooth device again. If still, it doesn’t works then try to clear PRAM/NVRAM on Big Sur
Fix 2: PRAM/NVRAM on Big Sur
This first step to do is resect PRAM/NVRAM after updating to Big Sur so that any old data should be removed from the cache.
Shut down your Mac.
Turn it on and immediately press and hold these four keys together: Option, Command, P, and R.
You can release the keys after about 20 seconds, during which your Mac might appear to restart.
You will need a wired keyboard to perform this reset, and the keyboard must be an Apple keyboard.
Fix 3: Run MacBook Hardware Test on Big Sur
This feature is used to find out how the MacBook’s hardware is functioning. If any of the equipment is not working fine, then you will see the error.
Detach all the peripherals and turn off the MacBook.
Next, turn on the MacBook and press “D key” from the keyboard.
You will see “Apple Diagnostic tool” or “Apple Hardware tool” on the screen.
Now, your MacBook is underdiagnoses, and you will get outcomes soon on the same screen.
There you will get some error code which will be helpful for you to fix MacBook Bluetooth not working after updating to macOS Catalina.
Fix 4: Remove Malware on Big Sur
No one knows when you are getting attacked by any virus it’s better to install a secure antivirus so that we will be tension free from virus attack that can also affect the performance of the MacBook Virus can come while surfing or downloading some file from the internet. They damage our system by hiding in some corner. To fix this, get a reliable anti-virus for your MacBook and clean your MacBook instantly.
Fix 5: Wait for an update of Big Sur OS
If you are running your MacBook pro on latest Big Sur OS os on any beta version then there might be the case Apple also know about the heating issue of Catalina OS so they might send an update to fix this issue for that you have to wait for an update to fix the Bluetooth not working issue in Catalina OS.
Fix 6: Contact Apple Support
If none of the solution works then there may be the possibility some hardware is damaged or creating the issue you should take your MacBook Pro to the nearest Apple care center. Find the real reasons from the apple support center nearby you.
Are you facing heating problems in your Macbook after updating it to Big Sur You come to the right place for this. We will present to you the best solution to fix this issue.! Read the full tutorial until the end. Not only MacBooks face overheating issues there are other laptops too currently facing this dilemma. For you, There are many situations in which MacBook gets overheated such as “MacBook overheating while charging,” “MacBook when closed,” “MacBook overheating after updating” or “MacBook overheating on normal usage also” when updated to macOS Big Sur 10.15 and more.
All these different reasons have few solutions which are listed below. If you avoid this problem, there are huge possibilities, including that a part of MacBook Air could damage it or cause integrated circuit failure. So, if you’re the one with MacBook overheating issues, prefer the following troubleshooting and fix “MacOS Big Sur overheating”.
What happened to me the last time? I would like to use a MacBook for design purposes. At that time, I worked with Safari, Pages, Number and iMovie. Suddenly the sound of the fan is too loud and too much heat is above the keyboard near the folding section. I check that iMovie is carrying my project and that Processor has overheated in a few minutes, I close iMovie and everything is fine. And make my MacBook regular once again, see what I do to fix MacBook overheating problem all the time.
If you face heating issue in normal usage also like only using for music or excel or just internet surfing on safari then see what you can do to fix MacBook Overheating problem all Time on MacOs Big Sur 10.15
Fix 1: Reset SMC
This first step to do is resect SMC after updating to Big Sur so that any old data should be removed from the cache.
Follow these steps for iMac, Mac mini, Mac Pro, and Xserve.
Choose Apple menu > Shut Down.
After your Mac shuts down, unplug the power cord.
Wait 15 seconds.
Plug the power cord back in.
Wait 5 seconds, then press the power button again to turn on your Mac.
For Intel-based Xserve computers that aren’t responding, you can shut down locally or by using remote commands. You can also press and hold the power button for 5 seconds.
Fix 2: PRAM/NVRAM on Big Sur
This first step to do is resect PRAM/NVRAM after updating to Big Sur so that any old data should be removed from the cache.
Shut down your Mac.
Turn it on and immediately press and hold these four keys together: Option, Command, P, and R.
You can release the keys after about 20 seconds, during which your Mac might appear to restart.
You will need a wired keyboard to perform this reset, and the keyboard must be an Apple keyboard.
Fix 3: Run MacBook Hardware Test on Big Sur
This feature is used to find out how the MacBook’s hardware is functioning. If any of the equipment is not working fine, then you will see the error.
Detach all the peripherals and turn off the MacBook.
Next, turn on the MacBook and press “D key” from the keyboard.
You will see “Apple Diagnostic tool” or “Apple Hardware tool” on the screen.
Now, your MacBook is underdiagnoses, and you will get outcomes soon on the same screen.
There you will get some error code which will be helpful for you to fix MacBook overheating after updating to macOS Catalina.
Fix 4: Remove large apps which are consuming high resources
If your MacBook is overheating for no purpose, then it might be possible that large apps are producing load on the processors and so MacBook is overheating in macOS Big Sur.
Launch “Finder” and open “Applications” folder.
Now, open “Utilities” folder.
Locate and click on the “Activity Monitor” and start observing the applications.
When you force stop the applications from Activity Monitor, there are chances that after some time it will cause the same overheating issues in MacBook Pro. So it is advisable to remove the applications that are no longer needed or else re-install it.
The Energy saver mode will stop the applications that are taking a lot of CPU resources without any requirement. This how the applications will not run in the background unless you open it and a lot of memory and processor will be saved. Hence MacBook overheating and freezing will be fixed.
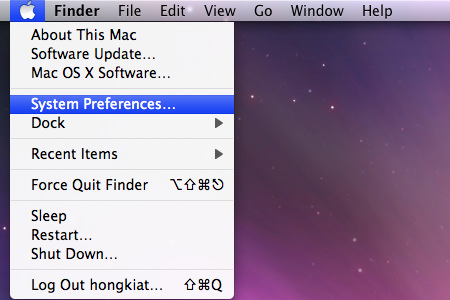
Click on the “Apple” menu and then open “System Preferences.”
Next, click on the “Energy Saver.”
Check the box near to “Automatic graphics switching.”
Fix 6: Clean the Fan
Is your MacBook is old? Haven’t you cleaned it yet? Now, it’s time to clean it. When you will open the Back of the MacBook and see the dust surrounds the parts of MacBook, you will be shocked. So it might be a reason why your MacBook is overheating for no reason after updating. The fans are running slow due to dust, and there are many more causes behind this. Clean the fans as soon as possible.so that proper air flow can be there inside your mac.
Fix 7: Remove Malware on Big Sur
No one knows when you are getting attacked by any virus it’s better to install a secure antivirus so that we will be tension free from virus attack that can also affect the performance of the MacBook Virus can come while surfing or downloading some file from the internet. They damage our system by hiding in some corner. To fix this, get a reliable anti-virus for your MacBook and clean your MacBook instantly.
Fix 8: Fall Back to an older version of Mac
After doing all these fixes if your mac is still heating in MacOs Big Sur then you MacBook might be not supporting MacOS Big Sur os 10.15 right now. Then you should downgrade macos from Big Sur to catlina.
Fix 9: Wait for an update of Big Sur OS
If you are running your MacBook pro on latest Big Sur OS os on any beta version then there might be the case Apple also know about the heating issue of Catalina OS so they might send an update to fix this issue for that you have to wait for an update to fix the heating issue in Catalina OS.
Fix 10: Contact Apple Support
If none of the solution works then there may be the possibility some hardware is damaged or creating the issue you should take your MacBook Pro to nearest Apple care center. Find the real reasons from apple support center nearby you.
Are you facing internet issue in macos Big Sur and tried many solution to fix it? Some browsers and devices store website location data in your system for quicker access to the DNS Cache. DNS Cache needs to be flushed to remove stored website location details. Here are some of the common ways to flush your DNS cache.
DNS, or a Domain Name System, is primarily what resolves website names into their respective IP addresses. So, if you are encountering an issue on your Mac where the name server is not resolving properly, or if you want a DNS change to be noticed by your system, you might have to reset and flush the DNS cache in macOS Catalina. This can also come in handy if you have made edits to your /etc/hosts file, and you want the changes to register without having to reboot your Mac. So,if you want to reset and flush the DNS cache on your Mac os Big Sur, follow the below steps to know how to do it.
Reset and Flush/Clear DNS Cache in macOS Big Sur
The process to reset and flush or clear DNS cache in macOS Big Sur is actually very easy. All it requires is for you to enter one command in the Terminal, and you’re done. Well, technically, it’s two commands in one line. If you want to flush DNS cache on a Mac, simply follow the steps below:
2. Then it will ask to enter a password. Enter your Mac login password and hit Enter.
3. If everything goes right then you have successfully reset, and flushed the DNS cache on macOS Big Sur. If you were encountering any issues with name servers, and such, they should now get resolved. You can try and do a “dig“, or an “nslookup” on a website you want, to see if your DNS issues have resolved.
Reset and Flush DNS Cache DNS Issues [Fixed]
You can reset and clear DNS cache in macOS Big Sur to fix most DNS issues that you might be facing. The method mentioned in the article works for Mac OS Big Sur 15, and even on macOS Big Sur. If you face any issues with the commands I mentioned, feel free to let me know in the comments section down below.
Apple just released MacOs Big Sur.The new firmware updates always bring with them new Wallpapers and we allow you to download them immediately in the highest possible quality through the Wallpapers Central portal, which is really loved and followed by all of you.
Big Sur comes with 6 new wallpapers. In particular, there are 3 variants, which are then supplied in Light and Dark versions. All wallpapers are available in 3 sizes:
You can download them below:
How to Get macOS Big Sur Wallpapers?
The process to change the desktop picture on Mac, remains the same for all Mac, however, if you are changing it for the first time, here’s how to change the wallpaper on Mac.
Once you download the Big Sur HD Wallpaper on Mac, open the Finder.
Usually downloaded files are stored in the Finder Desktop.
Right-click on the Wallpaper.
Then, select Set Desktop Picture.
If you don’t find Set Desktop Picture, then look for the Services, and then select Set Desktop Picture.
Directly Download MacOS bigsur Wallapaper in HD
Download 5K macOS Big Sur Wallpaper: Download Now – 7k
Download 4K macOS Big Sur Wallpaper: Download Now – 4k
Download macOS Big Sur California Wallpaper in Light, Dark, Night, Days mode From the Below link,
Download Macos Big sur wallpaper in HD from below link Direct Google drive link is available.
Here’s a little personalization you can do for your macOS Catalina. If your name did not appear on the menubar, here’s how you can get it to show on the right-hand corner of the menubar in Catalina os x.
How to show Name on Menubar in Catalina OSX
Step 1
Click the Apple logo, go to System Preferences.
Step 2
Click Account, click the icon at the bottom to unlock so you can change the settings.
Step 3
Click Login Options, check “Enable fast user switching” and select “View as: Name“
Voila, your name should now appear on the menubar, right hand corner.
If you’re wondering how to see WiFi passwords saved on Catalina os x without keychain and with keychain, I might be able to help. A friend of yours may have asked you for your wireless network password to use the internet. The problem is that you don’t remember where you wrote it. On the other hand, you have no way to access the router to find out. All you know is that your iMac or Macbook Air Pro connects to the Wi-Fi network automatically running on Catalina os x mac. Therefore, you would like to know if there is a way to find the WiFi key stored on the computer. Well yes, it is possible to find it, just remember the SSID .
How to see WiFi passwords saved on catalina
In this guide, in fact, I will explain how to see WiFi passwords saved on Mac. Precisely, I tell you how to enter Keychain Access and how to find the secret key of a stored wireless network on Catalina os x mac. Furthermore, since Keychain Access is available starting from Mac OS 8.6 , I also tell you how to find out using the Terminal on Catalina os x mac. So let’s not waste any more time, let’s start immediately.
How to see WiFi passwords saved on CatalinaMac
Before showing you how to see WiFi passwords saved on Catalina os x , I want to remind you that it is not possible, at least with this method, to find the key of a wireless network to which the computer has never connected. The Mac need not be connected to it right now. However, it is important that the wireless network has been used in the past, at least once. In addition, as I said, to find the secret combination you need to know the SSID , or the name of the Wi-Fi network.
That said, two methods can be used to view WiFi passwords saved on Catalina os x . The first is the one that uses the Keychain Access software. The second is the one that foresees the use of the Terminal on Catalina os x. There is no difference in the result obtained. Below, find both procedures.
How to find wifi password on Catalina with Keychain Access
If you’re wondering how to see WiFi passwords saved on Mac , the most common tool you can use to find out is Keychain Access .
Once open, in the Keychain sidebar, click System. You will see a list of stored keys. Order by Name with one click. Then, locate and choose the WiFi network of your interest. After opening the dedicated tab, to see WiFi passwords saved on Mac, from the Attributes section, enable the Show password flag.
By doing so, you will see the warning ” Keychain Access would like to make changes “. Type your Username and Password to allow the action. Then, click Ok. If you see another similar warning, confirm your credentials again, and select Allow. At this point, next to Show password you will be able to see the stored WiFi key. Write it somewhere and close.
How to find wifi password on Catalina without Keychain Access using terminal
When you wonder how to see WiFi passwords saved on Mac, you could use the Terminal to get to grips with it. Even on macOS, you can launch command with the terminal to find out the stored WiFi keys.
To proceed, first open the Launchpad , go to Other and click on Terminal . When the command line interface appears, type the following:
Once the command has been written, change the script nome-rete-WiFiI highlighted by entering the name of the WiFi network whose password you want to know. Then, hit the Enter button .
If you typed correctly and if the wireless network was already connected, you will see the warning to allow access to the MetadataKeychain . Click Allow and, if prompted, enter your username and password.
After that, you should see an output containing the stored Wi-Fi password , like this:
password: " WiFi-password "
In some cases, you may not be able to see WiFi passwords saved on Mac because you receive the following error :
security: SecKeychainSearchCopyNext: The specified item could not be found in the keychain.
If you are sure that the name of the wireless network is correct and that the Mac has connected to it at least once, check the quotes in the command. It doesn’t have to be these “ but these ".
In addition to the substance, curiosity: every year the name chosen by Apple for the new version of macOS is eagerly awaited. Will it be Mammoth, Monterey, Skyline or something different this year?
The tradition of naming the major releases of operating systems for their computers dates back to Mac OS X, when Apple began to choose feline names and then, in 2013, move on to names related to California with OS X Mavericks.
Just in 2013, it was discovered that Apple had registered over 20 California-themed brands for future versions of macOS. Over time, some of those brands like Yosemite, Sierra and Mojave have actually been used by Apple for its Mac operating system updates, while many others remain unused and others have been abandoned.
Shortly before WWDC 2019, only the trademarks of the Mammoth , Monterey , Rincon and Skyline brands remained active under Apple’s name . Anyone registering a trademark in the U.S. has 36 months from the approval date to file a usage declaration demonstrating their intention to use that trademark. This “intention” can be renewed every six months before that trademark is put on the market, for a maximum of 6 further renewals before the company loses all rights to that trademark.
In 2019, Apple used the name Catalina which was not present in the previously registered names, but it was an exception and this year the company could return to its original list. In this case, the available names are only three of the four already listed before, given that “Rincon” was abandoned in September 2019 after the 36-month deadline. Mammoth, Monterey and Skyline remain active:
Mammoth probably refers to Mammoth Lakes and Mammoth Mountain, very popular areas for those who love skiing and hiking in the Sierra Nevata mountains. The brand was registered in March 2019 and was renewed in March 2020.
Monterey is a historic city and a popular vacation spot on the Pacific coast. The brand was registered in December 2013, but the authorization did not arrive until June 12, 2018. The last renewal request was made a few days ago.
Skyline probably refers to the scenic Skyline Boulevard that follows the crest of the Santa Cruz mountains south of San Francisco.
So what will macOS 10.16 be called? Mammoth, Monterey and Skyline all seem valid options, but the company could follow the example of 2019 and propose a macOS 10.16 with a totally surprise name. Furthermore, given that macOS 10.16 will still be related to Catalina because it will have few substantial innovations, the name could be connected to this location: macOS Channel Islands (the group of islands of which Catalina is part) or macOS Avalon (the only city in the Santa Catalina island in California).